


Fashion accessories are more than just a complement to a woman’s outfit. They are also a way for her to express her personality and style. Each accessory, whether it’s a simple pearl necklace or a practical designer bag, can transform an outfit. This comprehensive guide explores the different types of fashion accessories for women, and provides tips on […]
Read More
Fashion is a dynamic industry. It’s not enough to be trendy. You also need to understand the changing dynamics of style and consumer preferences. Wholesale clothing stores are a valuable resource for fashion retailers, designers and style-savvy people. These stores provide a way to access a wide range of styles, essentials for the season, and avant garde clothing at affordable prices. This […]
Read More
Fashion design is a creative and innovative field that constantly pushes the limits of what’s possible. What happens when designers take a leap of faith into the unknown and inject adventure into their work? This exploration leads to stunning creations which redefine fashion norms and create new trends. Fashion Design: The Spirit of Adventure Fashion design adventure is all […]
Read More
The bridal lehenga plays a vital role in a traditional Indian marriage. The bridal lehenga is the most important outfit for a woman. It can make her look more beautiful and graceful. It can be difficult to select the perfect bridal gown with so many styles and designs available. This article will give you tips on how to choose the best […]
Read More
In the past few years, hair smoothening treatments have taken over the world. Although the treatment is very popular and sounds fancy, it has some side effects. Let’s first understand what this treatment is all about. Hair smoothing is a 4-step process. It involves thoroughly cleaning the hair with a deep-conditioning shampoo, applying formaldehyde to it, blow-drying the hair and straightening […]
Read More
Smoky eye makeup can instantly make your appearance stand out at a special occasion or event. Even the red carpets, and runways are renowned for this eye makeup. It will give you an amazing and dramatic look if you wear it correctly. What is a smokey-eye? A smokey eye is a diffused and blended version of three to four shadows, where […]
Read More
When you receive an invitation from your bestie, it’s exciting. But the question that arises when you stand in front of a wardrobe is “What should I wear to achieve this perfect look?” What should I wear? A short dress or a chic midi skirt? These fashion dilemmas can be endless, but don’t worry; we have you […]
Read More
When choosing the right handbag for women, there are several factors to consider. It’s important to strike the right balance between functionality, practicality and finding a handbag that suits your style. Functionality And Practicality: A bag that is suitable for the office should be more than a statement of style. The bag should be functional and practical to hold all of the items you […]
Read More
You can’t just choose the color of nail polish or the shape of your nails. Consider the event, your lifestyle and how much time you want to spend in the salon. You can customize your nails to fit your personal style. There are many options for nail types and styles. Everyone, from your grandmother to your best friend, will find something […]
Read More
Halo hair extensions are revolutionizing the way people think about hair transformation. These extensions not only add volume and length instantly, they also protect natural hair against damage that is usually associated with permanent extensions. These tips and tricks can help you make the most of your halo extensions, whether you are new to this revolutionary hair accessory […]
Read More
Selling a home marks a major milestone. The process is not without stress and requires a lot of work. The home inspection is a major step in the process. A report of an inspection can make or break a sale, depending on your handling. After a thorough home inspection, you can confidently sell your home. […]
Read More
Buying a home is one of the most significant investments one can make. However, beneath the surface of what seems like the perfect abode, there may be lurking issues that could turn your dream home into a nightmare. This is where home inspections play a crucial role. A home inspection is a thorough examination of […]
Read More
Buying a home is one of the most significant investments you’ll ever make, and ensuring that the property is in good condition is crucial. This is where a home inspection comes into play. Home Inspection in Port Charlotte is an essential step in the home-buying process, providing potential buyers with a comprehensive assessment of the […]
Read More
A Vehicle Warrant of Fitness (WOF) is a crucial aspect of vehicle ownership, ensuring that vehicles on the road meet safety and emission standards. Conducted by qualified mechanics, the WOF inspection involves a thorough examination of various components to assess the vehicle’s roadworthiness. In this article, we delve into the details of what mechanics typically […]
Read More
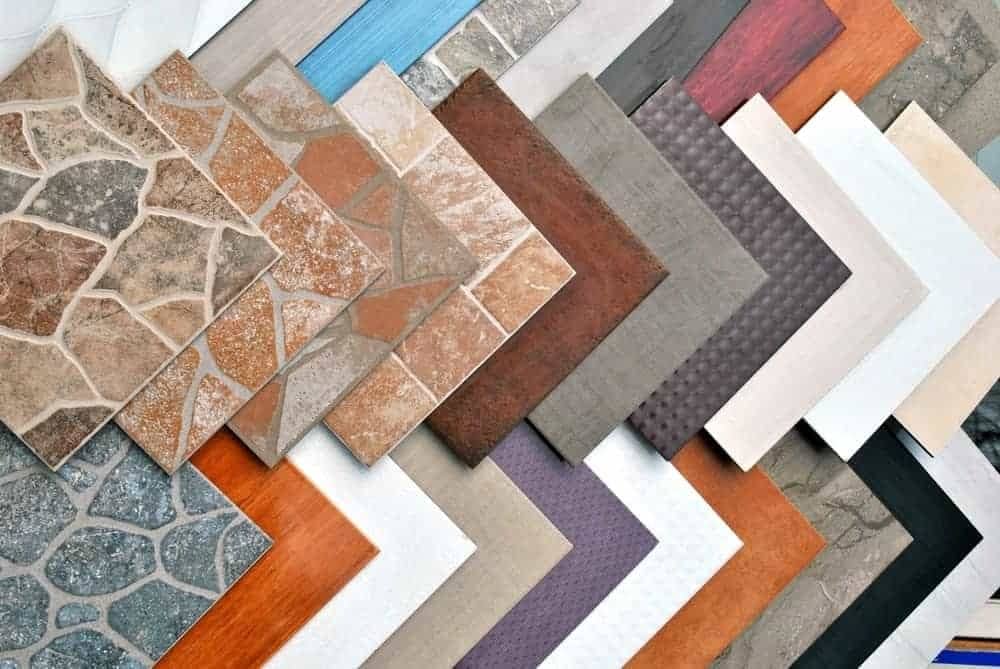
When it comes to designing a kitchen or bathroom, we often overlook the importance of the backsplash. However, it plays a huge role in safeguarding your walls against moisture and spills. The practical function of a backsplash is just as important as its ability to enhance the style and character of your space. Selecting the […]
Read More
Window cleaning is an essential part of maintaining a clean and welcoming environment, whether it’s in your home or at your place of business. However, achieving streak-free, crystal-clear windows requires more than just elbow grease – it requires the right tools for the job. In this article, we’ll explore the ins and outs of window […]
Read More
House painting is an essential aspect of maintaining and enhancing the aesthetics of your home. Whether you’re looking to refresh the exterior or interior of your house, finding the right painters for the job can make a significant difference. In Auckland, where there’s a plethora of options available, it’s crucial to know how to sift […]
Read More
In today’s fast-paced business world, maintaining a clean and organized workspace is crucial for productivity, employee morale, and overall business success. However, keeping a commercial space clean can be a daunting task, especially without a structured plan in place. This is where a well-designed commercial cleaning checklist comes into play. In this article, we’ll explore […]
Read More
The overwhelming task of purchasing a dream house can be made a little easier with the latest technology. Thermal imaging is one such technology. Infrared radiation is emitted by every object with a temperature. This light is invisible to the naked eye. Thermal imaging is the answer! Thermographic cameras are used to convert infrared radiation […]
Read More
We all have a dream home in mind when we begin the process of buying a house. Professional home inspection services can detect hidden issues that are often below the surface. These services use a variety of specialized techniques and tools to provide a thorough and accurate assessment of the property. This blog will guide […]
Read More
In a world brimming with diverse forms of self-expression, temporary tattoos have emerged as a captivating medium for individuals to showcase their creativity. Among the myriad of temporary tattoo designs available, the Dreamcatcher Temporary Tattoos stand out as enchanting symbols that weave a story of mystique and allure. Let’s delve into the fascinating realm of […]
Read More
Crafting an ideal kitchen involves a delicate balance of style and functionality. Among the numerous components that contribute to this harmony, kitchen benchtops hold a paramount position. These surfaces not only serve as workspaces but also significantly influence the overall aesthetics of the kitchen. In this comprehensive exploration, we’ll delve into various ideas for kitchen […]
Read More
Restoring a roof is a major undertaking. It can be a rewarding endeavour that helps maintain the attractiveness and structural integrity of a building. Whether you’re dealing with a residence or a commercial property needing some care, achieving success in your roof restoration project requires careful planning and meticulous execution. This article will delve into […]
Read More
You may be tempted to use your fireplace now that winter is approaching, but what happens if you have a problem with your chimney? Why are you delaying chimney repairs if you see cracks in your chimney or bricks that have broken? Ignoring a problem won’t solve it. You could find yourself with a collapsed […]
Read More
You need the right house if you want to enjoy your life in comfort! Let’s look at what seniors can expect from a home inspection to help them achieve this. Safety and accessibility Seniors should pay attention to accessibility and safety features when inspecting a home. To prevent accidents, ramps and stairs should be stable […]
Read More
Have you been thinking about getting a full body wax, but are still unsure? You are in the right place, beautifully! You can find all the necessary information about the full-body waxing here. Everyone has hair on their body. The growth of hair differs from person to person. Some people choose to remove their hair. […]
Read More
Concrete is one the most durable, customizable and cost-effective building materials for commercial and residential applications. However, it is not indestructible. It is not impervious to weather damage, soil shifting, heavy traffic or time. You’ll need to decide whether concrete replacement or repairs are the best solution for you if you have cracked driveways or […]
Read More
Brick homes are a timeless style. The durability of this material is unmatched, both in terms of its structural integrity and aesthetic appeal. Nevertheless, bare brick has its disadvantages. Taking steps to minimize them may be the best route for you. We will be discussing the advantages of painting brick homes in today’s blog and […]
Read More
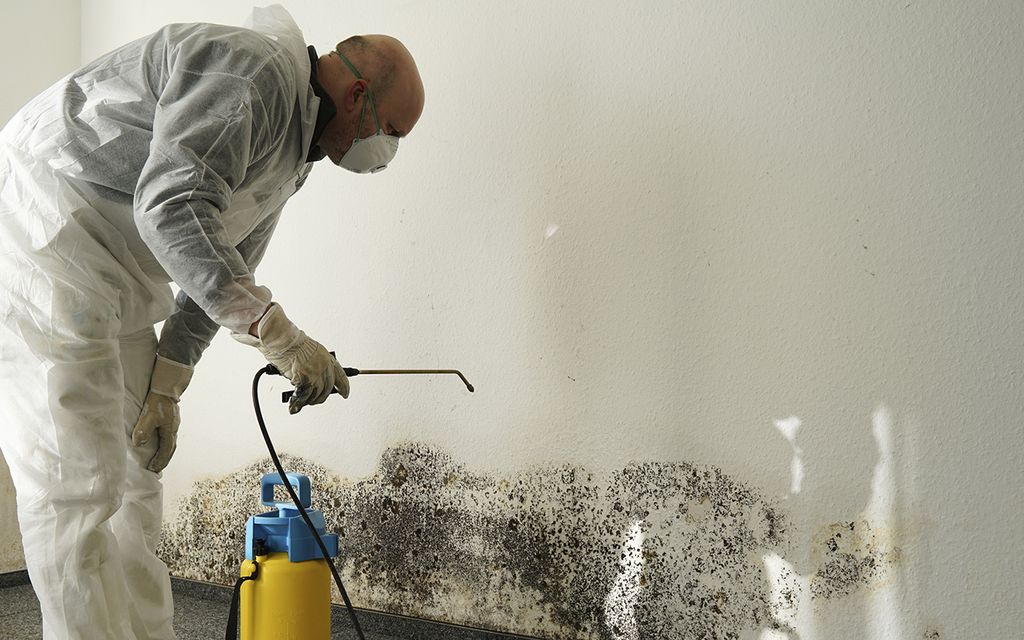
Mold can be a significant issue for homeowners or renters a like. A mold infestation not only diminishes your quality of life but can also exacerbate conditions like asthma. In the instance of mold appearing during a tenancy, there might be an obligation to cover the cleaning expenses. This prevalent problem doesn’t discriminate between property […]
Read More
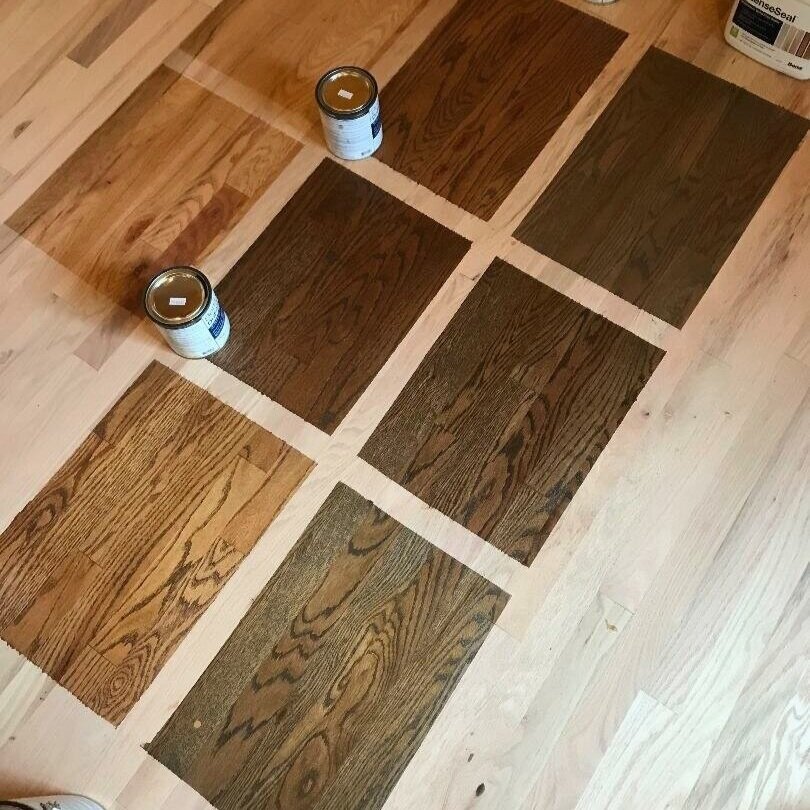
The warmth and timeless appeal of hardwood floors can transform any space, adding character and beauty to your home. Selecting the perfect stain colour for your hardwood floors can be challenging. After all, there are so many options available, and in order to make a choice, you should consider your own taste and preference. As […]
Read More
If you’re in the process of buying a new home, congratulations! It’s an exciting journey, but it’s also a significant investment. One crucial step in the home-buying process is a thorough home inspection in Winter Garden Fl. In this comprehensive guide, we’ll walk you through what to expect from a home inspection, covering everything from […]
Read More
In today’s fast-paced world, where time is a precious commodity, maintaining a clean and organized home can be a daunting task. The demands of work, family, and social commitments often leave us with little energy or time to dedicate to household chores. This is where the services of professional house cleaners come to the rescue. […]
Read More
In today’s fast-paced world, maintaining a clean and organized home, especially when searching for house cleaning services in Bristol, can often feel like an uphill battle. We all lead busy lives, and finding the time and energy to keep our living spaces spotless can be a daunting task. However, fear not, for there are expert […]
Read More
The possibilities are endless when you hire a limousine company. There are many factors to consider when choosing a limo for a corporate event, wedding, prom or birthday party. Choosing the right transportation can also be difficult. From company facilities to vehicle size and type, it is not easy. You should research all of these […]
Read More
Mandaps play a major role in the London wedding. Many people consider it to be a necessity. In a beautiful and tranquil setting, the couple exchanges vows in front of their friends and family. Mandaps are a great way to show the four essential elements of a successful marriage – love and trust, happiness and […]
Read More
Commercial shopfitters are essential to the process of setting up retail space. The end goal of course is to satisfy the needs of the company. It can be anything from installing shelving and racks to finishing the store design and layout. This type of work must therefore be carried out by professionals who are experts […]
Read More
A bride-to be, a little frazzled by wedding planning, asked, “Does Hen’s Party Paint & Sip Events?” Oh, honey! We do more than just host – we put a dazzling display on stage! You may be wondering what a Hen’s Party is at hire a private bartender. Imagine a memorable soiree, where paintbrushes join forces […]
Read More
Rubber surfacing offers so much more to playgrounds and schools than just a safe surface. There are many benefits to using this product, whether it’s for school, office, home or playground. Rubber surfacing has many benefits. 1. You can install custom logos or designs. Rubber surfacing can be customized to include your own designs or logos. […]
Read More
Renovations can bring a new look to the living area and be a fun experience. Once the renovation is complete, you will need to clean up all the debris. The post-renovation cleaning is a difficult task that takes time, patience, and effort. This article provides a complete guide to deep cleaning services in London and […]
Read More
Do you have an old vehicle that is not working in your garage taking up valuable space? Do not let it sit in your garage! Scrap Car Removal Services in Adelaide are a convenient, eco-friendly way to get rid of your unwanted vehicle. You can contribute to a cleaner and more spacious environment by choosing scrap […]
Read More
If you’re a company that is new or already established, it will be important to build a client base. Even under the most difficult circumstances, regular clients can keep your business afloat. Contract cleaning businesses can be highly profitable. Contracts may be required for cleaning services in hotels, offices, banks and schools. Contracts will ensure that you […]
Read More
Dinnertime can be a busy time! Many of us have probably had a busy day, may have young kids under our feet, or simply be juggling a few jobs at once. And when we are in a hurry to get the meals out on the table, it can often lead to a bunch of mishaps. […]
Read More
Signs of Roaches in Your Home and How to Get Rid of Them A disgusting as well as filthy creatures that homeowners encounter is the cockroach. Cockroaches are a sneaky and dangerous pest which can easily gain access into your home via tiny cracks and crevices all around the perimeter. When cockroaches gain access to […]
Read More
Painting your roof is a vital aspect to maintaining the overall appearance and longevity the roof. It is however not a job that is best left to people who are not experts. Although it might be tempting to paint your roof on your own but it is essential to think about the expertise knowledge, experience, […]
Read More
Construction companies lease different kinds of construction equipment on a daily basis. Anyone can rent equipment. You need a skilled operator and an innovative business to get the most from your rental. To get the most value from your rental, making plans by asking questions such, “how does a heavy equipment rental work” and “what […]
Read More
Are you worried about the dismantled panel in your vehicles? When it comes to repairing vehicles, panel beaters play a role in bringing them to their original condition. Whether it’s a scrape or a major collision, panel beaters are professionals who specialise in fixing and reshaping vehicle panels. Their expertise goes beyond addressing issues; they […]
Read More
Taking care of your vehicle’s engine is crucial for its long-term performance. However, one overlooked maintenance task is the replacement of the engine air filter. The engine air filter plays a role in keeping contaminants away from your engine, ensuring smooth and efficient operation for years. By changing this filter, you can improve the performance […]
Read More
A number of such two-sided contests may be arranged in a tournament producing a champion. Many sports leagues make an annual champion by arranging games in a regular sports season, followed in some cases by playoffs.
Read More
Edge safety systems are crucial to prevent injuries and falls while working at heights. They are made up of nets, barriers, guardrails or other equipment which create a safe zone around the edges of a platform, roof or other surface that is elevated. But, the process of installing or maintaining these systems is a process […]
Read More
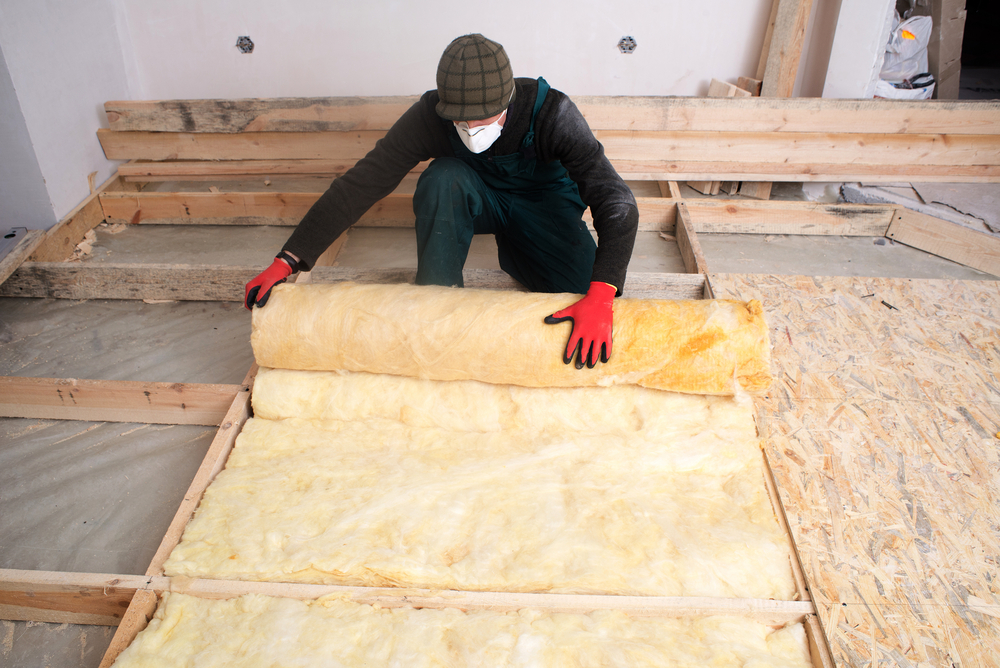
Floors can cause a significant amount of heat loss in your home, accounting for around 10% of all heat loss. Underfloor insulation is a great way to help reduce heat loss and ensure that your home has a complete thermal envelope. This guide will explain your options for underfloor insulation in modern homes with concrete […]
Read More
Many homeowners want to receive free terrestrial TV channels. This is because terrestrial TV offers sports and news channels for free in many cases. According to statistics 78% of millennials have access to traditional television, specifically because they can watch sports and news channels for free. You will need an antenna to receive free-to-air TV. […]
Read More
Steam cleaning your carpets at least every year, is as important as having your car serviced. All of us service our vehicles every year, or every 10,000 kilometers… whatever occurs first (well this is the time we all need to be planning to do!) What is the reason we do this? To prolong the life […]
Read More
Ah exterior house washing – the ideal method to make your home appear brand new! However, before you get started cleaning away grime and dirt there are some points to be aware of. In this blog we’ll go over the best practices and rules of exterior cleaning to avoid costly errors and maintain your home […]
Read More
Security cameras for homes today in the right location are an affordable and viable alternative to costly professional-installed systems. The crisp, high-quality 1080p footage, AI human and motion detection, battery lives that last for a long time and smart home integrations are excellent instruments for documenting or deterring the perpetrators of crimes. Particularly difficult for […]
Read More
Are you wondering what a retirement village community life is like? Well, every phase in our lives presents us with opportunities to grow and learn. Retirement is no different; it presents new experiences, new friends and a new way of life. We understand that change can also be tricky at first. But one thing to […]
Read More
Confidence is a powerful attribute that shapes how we perceive ourselves and interact with the world around us. For many men, unwanted body hair can lead to feelings of self-consciousness and discomfort, negatively impacting their body image. Fortunately, electrolysis hair removal offers a permanent solution to unwanted hair growth that goes beyond simply removing hair. […]
Read More
The search for the ideal home is an exciting adventure full of dreams of warm evenings, joyful gatherings with family, and precious moments. In all this excitement, it’s essential to keep in mind that the ideal home isn’t all about style It’s also about safety and security. This is where a professional house inspection comes […]
Read More
Is it finally time to begin searching for the perfect (dream) house? If yes, then you deserve a big congratulations! However, prior to closing the deal, and before you drink that champagne bottle to celebrate, you should make certain to have your new house thoroughly examined. A trained and professional eye can find all the […]
Read More
The most popular remodeling project among homeowners is a kitchen remodel. These projects improve the look, feel, and functionality of a kitchen, while also increasing its value. Renovations to kitchens can yield some of the best ROIs. On average, homeowners can recover up to 74.2 percent of their investment in a well-implemented renovation. A report by the National Association […]
Read More
7 Fantastic Ideas To Implement With Your Bathroom Remodeling Contractors If you’re considering a complete overhaul of your bathroom, it might be the perfect time to make contact with professional bathroom remodeling professionals. If you’re considering the complete remodel of your bathroom or just want to improve some features, the right remodeling can transform the […]
Read More
It can take time to employ an inspector for your home to inspect the house prior to purchasing one, yet the time put into it can save you lots of cash. What exactly will a house inspection service find in a home? Have you require a house check? An inspector of homes can search for […]
Read More
There are many reasons the interior design professional should insist that his client to have an inspection of the home before the interior design project begins. Here are five of the most important reasons. Don’t get involved in the blame game After the interior designer has started the work, any problems that arise with the […]
Read More
1. What’s the difference between the use of an exposed fastener as well as standing seam roofs made of metal? There are some fundamental differences between the installation method of hidden and exposed roof panels. One of the most obvious differences is the method used to attach panels. Exposed fastened systems are based on an […]
Read More
You’ve signed a contract for your dream house and are now all set to schedule the home inspection. The inspection is a crucial element of the homebuying process since it offers you an objective look at the state of your new house. However, it could be a stressful and stressful process. Imagine that the home […]
Read More
When you are buying a house it’s an excellent idea to conduct an expert home inspection. Most of the time you can make the purchase contract contingent upon the results of a satisfactory inspection. If you aren’t happy with the results of your inspection then you are able to end the contract, receive your money […]
Read More
It is believed that the many pleats folded in a chef’s hat were originally added to mark the hundred ways that the chef could cook eggs. Also, it is believed famous French chef Marie-Antoine Careme wore a staggering 45cm tall toque during the 1800’s. To signal his high standing in the kitchen, proving the fact […]
Read More
The Hearthstone Historic House Museum: Preserving history Hearthstone House was the first private residence in 1882 to use Thomas Edison’s hydroelectric system. The house was renamed the Hearthstone Historic House Museum. On their website it is stated that “the residence still contains original Edison electroliers and original light switches as well as some of the […]
Read More
There is never a time too late to begin learning something new! Perhaps you attended lessons in your youth and would have liked to practice more! …or you’ve always had a desire to play the piano, but you’ve never had the chance to master it. There are a lot of us in this world and […]
Read More
What is a Wind Mitigation inspection? Wind mitigation inspections are visual assessments of the home’s ability to resist damage in a storm. A licensed general contractor or architect, an engineer, a building inspector or a home inspector will examine your home’s features and note how well it can withstand the wind. They may also suggest […]
Read More
It’s not easy to find the right contractor for a project, but that’s because there are so many options. It’s not because there aren’t enough options, but rather that you don’t know who to trust. Clients should do thorough research on companies to ensure they are a safe choice. What are some important things to look […]
Read More
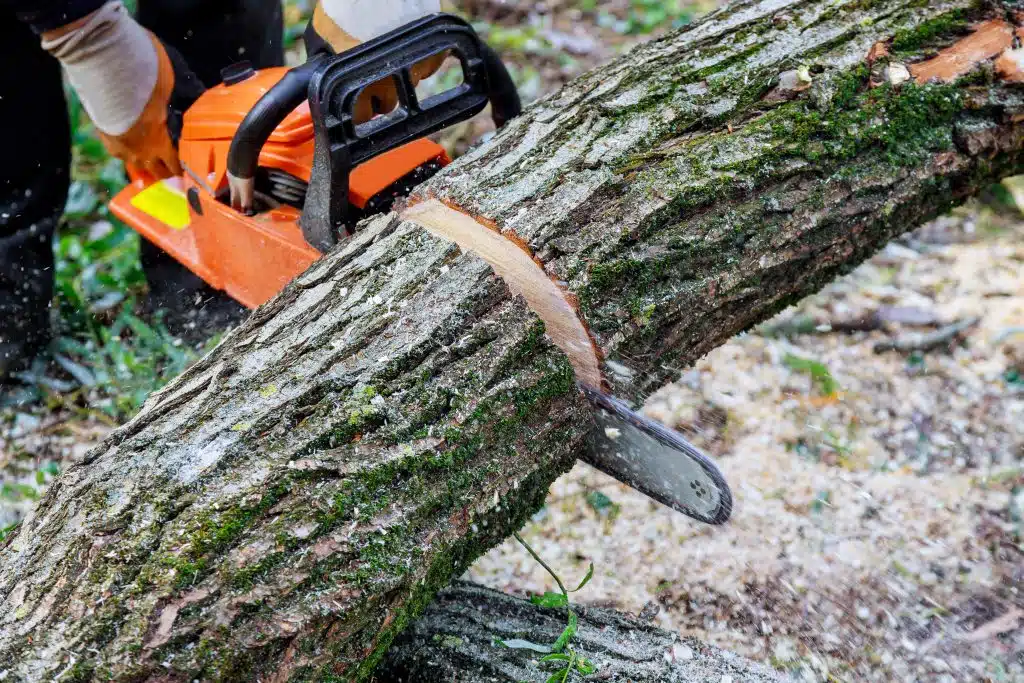
Do you have a certification as an arborist? Arborists are experts in trees. Arborists are specially trained to take care of trees. Certified arborists are the best in their field. The International Society of Arboriculture certifies these arborists. Arborists who are ISA certified have undergone extensive training. They also follow a very specific code of […]
Read More
It is easy to lose yourself in the details of renovations. Instead, focus on what you see. Most homeowners know what they want for their ideal kitchen, bathroom, and living space because we spend so much time in our homes. It makes sense, as we spend most of our time in these areas. Even though […]
Read More
You need to be aware of certain things if you plan to install your antenna and TV aerial to save yourself a few pounds. You should be able to align the TV antenna perfectly if you want your television to work properly. This is not as easy as it seems. Here are some tips and […]
Read More
Plastering is the process through which rough surfaces of wall and ceiling roofing are altered or twisted or rendered to give smoothness. In the beginning, wet materials are sprayed over the bricks or blocks before the proper equipment is employed to smooth the surface even. The main reason for plastering is to create a hard […]
Read More
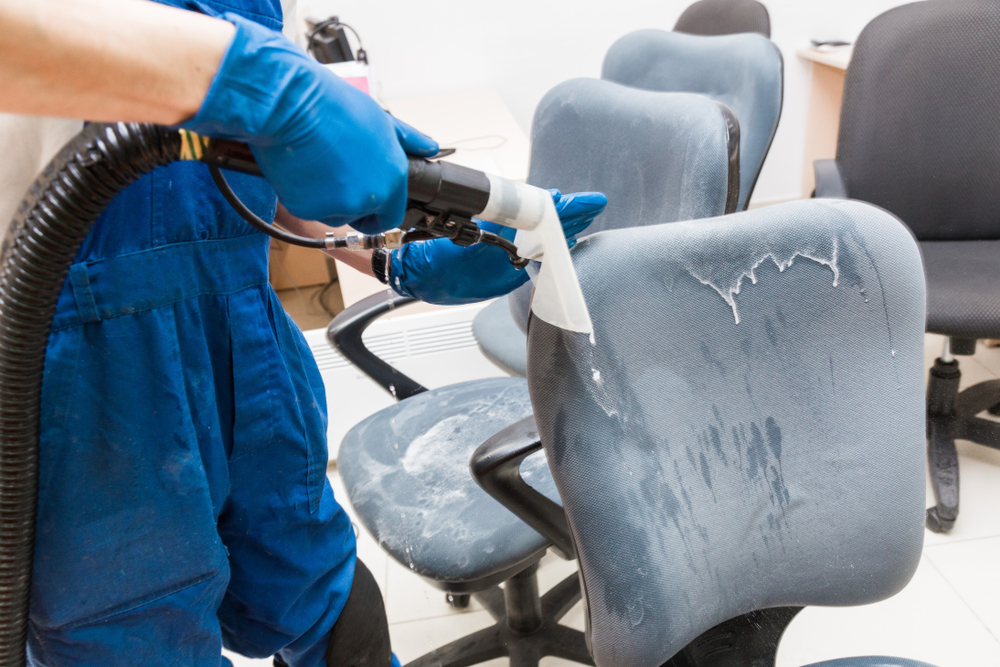
Most of us don’t realize the wear and tear to the chairs in our offices until they’re worn down or near breaking. These stains aren’t just for eyesores they could also be the breeding ground for all kinds of mold and bacteria which can cause illness and release a foul smell emanating from your chair. […]
Read More
Prior to moving into the home of your dreams You will have to sell your home. To determine the right price for your sale which will enable for the selling of your house in a reasonable period of timeframe, you have to determine the condition of your home and the changes that need to be […]
Read More
If you’re a pet owner, you are aware that keeping your home tidy can be a struggle. Pets are known to shed fur and dander. This will quickly accumulate on your carpets, making the carpets to look and smell soiled. Carpet cleaning in clearwater is an excellent option ensure that your carpets are new and […]
Read More
Carpentry is among the oldest methods of construction across all societies It has also evolved to include new techniques, materials, and tools. A term used to describe various methods and techniques Carpentry is a modern term that covers various construction materials, not simply wood. It doesn’t matter if you’re contemplating taking our CPC30220 Certificate III […]
Read More
The Seller How can a seller prepare for an inspection of their home? What is the job of a Home Inspector in Fulshear, TX? perform? The inspector at your home will test every part of your home. The Home Inspector will use his knowledge gained from hundreds of inspections to provide eight tips for preparing […]
Read More
A Wind Mitigation report is required by an insurance underwriter in order to verify or deny the existence of wind-resistant characteristics of a home that allow the house to stand up better in the event of a storm. A Wind Mitigation in Tampa check should last between 30 and an hour. The inspector will inspect […]
Read More
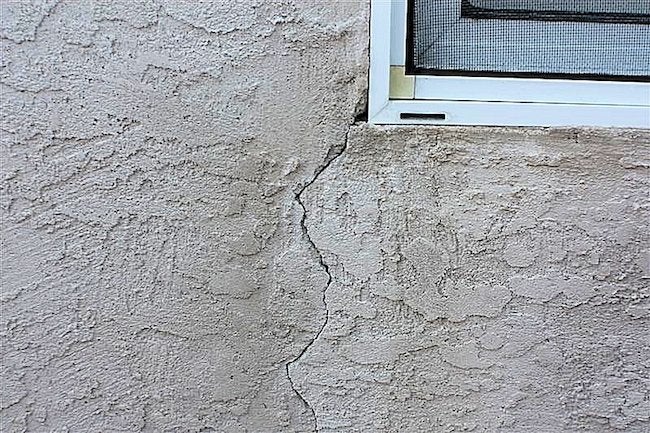
Have you observed that your foundation is cracking on your property? Are you worried that your foundation might require costly, lengthy repairs? Not necessarily! This article will help you understand what happens when fractures to the foundations of your house are not a problem and when it’s time to contact the Foundation Contractors in Los Angeles […]
Read More
No matter if you’re moving across to the next street, or even across the nation making plans for a house moving can be a stressful experience. From packing your possessions to selecting the best moving company There are many ways to effectively organize your move. Planning ahead can make the moving day smoother and less […]
Read More
MacBook repair of the logic board is a complicated task. Many people panic when their beloved MacBook is beginning to show signs of failure. One of the major reasons is the dependence on the gadget. We keep all our essential data on our laptops or a computer. When the computer starts to fail it is […]
Read More
Metals are versatile, essential and can be used for a variety of purposes. Metals are used in industrial applications such as trucks, cars and airplanes. Metals can be used for domestic purposes such as the manufacture of cutlery, crockery, and packaging. Metal recycling has the advantage that it can be recycled many times without changing […]
Read More
Every year, the average homeowner spends between 1% and 4% of the price of their house on maintenance. This could easily amount to thousands of dollars. Many homeowners have tried DIY fixes to reduce the amount of heat that is generated in their homes. This is especially true when it concerns ceiling damage. You may […]
Read More
You’ve made a long-lasting investment when you purchase your leather sofa. Leather looks even better with age, retaining its elegance and adding character to your décor. To ensure this, you’ll need to take the time to properly care for your new furniture. Leather is sometimes unfairly labeled as requiring high maintenance. However, with some knowledge and […]
Read More
Customers who call us for washing machine repair often complain about their washing machines not filling up with water. This fault can be caused by a number of factors. In this article we’ll look at a few and show you how to fix it yourself. Contact us if you are still experiencing problems with your […]
Read More
Fixes for home inspections can be made easily for less than $20. Over the years, we’ve found that the majority of homes we inspect have the same list of repairs. Some of our customers become a little nervous when they see the items highlighted in scary red. These red flags could make you cringe when […]
Read More
3 Things You Need to Know Before Paving a New Parking Lot When it comes to paving a new parking lot, there are three things you should consider before tearing up your old lot and starting fresh. The first is that it’s going to be costlier than you think, the second is that there are […]
Read More
You want to make sure that your roof can withstand years of exposure and stress. How can you be sure that your roof will protect your house without a roof inspection? A new roof inspection will ensure that your roof replacement is in good structural condition. A roof assessment is necessary to ensure that there […]
Read More
You don’t have to replace your hardwood floor if it develops scratches or dents. Refinishing is an option to rejuvenate the flooring by removing the finish. Apply color treatments to the floor and seal it with a top coat finish. This will give the floor the look of a new floor at a fraction of […]
Read More
No degree in interior designing is required to design your kitchen. Designing a new layout for your kitchen can be fun and easy to do yourself. Many homeowners have trouble getting started with their kitchen designs. We often have a vision in our head but struggle to translate it onto paper. Using templates to plan […]
Read More
Refinishing hardwood floors is a costly process. The cost of refinishing hardwood floors can vary greatly depending on the size and type of floor you are applying. You can also decide whether to hire a pro or do the job yourself. However, there are some price ranges that can be used as a starting point. […]
Read More
Evening meals and long lunches at the table are some of our fondest memories. Families and friends gather together to share ideas, experiences and laughter. It’s not just about special occasions, like Christmas or birthdays, but also your normal weekday dinner, where the whole family gathers to reconnect and catch up at the end a […]
Read More
We understand that choosing new tiles to remodel your home is exciting. Tiles knows this. The exciting part of designing your tile application is choosing the tile colour, pattern and style. However, we often overlook another important design element: grout color. The grout color can be used to draw attention to specific aspects of the tiles or […]
Read More
Power surges can affect the functioning of machines such as televisions, modems and computers. All electronic appliances fall into this category. The whole-house surge protecter is able to tame the beast that is power surges and ensures the appliances on the other end are safe without causing any damage. This system will protect all of […]
Read More
You can build a fence over a retaining wall. Fence Mounted on Retaining wall You know that this situation can be challenging. There are many different types of retaining wall fence in Perth. There are several ways to mount a retaining-wall fence. We will explore some options. Here are some ideas for retaining walls. First […]
Read More
Brisbane Removalist has a team of professionals who are experts in moving both office and home. The team is composed of a leader, a group of labourers and movers who are able to move the office or house goods from the apartment into the truck. As they are equipped with trucks, machines and other tools […]
Read MoreThe first time a buyer steps into the home before closing the deal, a home inspection can be exciting. The buyer can also find serious flaws with the house, its foundation, interior and exterior, and request that the seller fix them. It can also be exhausting to check on so many different things. The buyer […]
Read More
Do I need a mold inspection? Mold inspections can be important if there is a suspicion that something is wrong. Mold can be a hidden health hazard that you don’t want to risk. In and Out Property Inspections have seen mold and mildew test results that are shocking. This article will first discuss the signs of a possible mold […]
Read More
You probably do not think about the electrical system of your business until there is a problem. By then, it is often too late. Electrical problems can be dangerous for employees and customers. They can also cause expensive property damage. It’s vital to have an electrical system inspected by a professional on a regular basis. […]
Read More
A home inspection is one of the most crucial things to do when buying a house. It may be useful to know what you can expect if this is the first time that your property has been inspected by professionals. You might be wondering what a home inspection covers, how much it costs and what […]
Read More
Most sellers are unaware that they can get a home inspection before listing their house. Those who do realize this option tend to choose not to have one. It’s understandable that a seller might find it difficult to pay for a home inspection before putting their house up for sale. It’s a decision that shouldn’t […]
Read More
It’s easy when it comes to cleaning, in general, to think that you can do it yourself. You may be better off hiring a professional rug cleaner in adelaide to clean your rugs. Rug dusting tools are available Professional rug cleaners will use specialized equipment to remove more dust, animal dander, and dirt from your rug. It […]
Read More
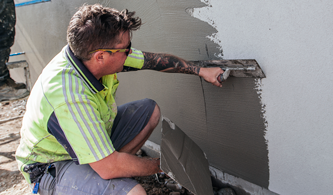
The exterior grade plaster is also called stucco. It’s a cement-based finish. Plaster is available in dry form, which, when combined with water, produces a thick paste. Contractors and homeowners can apply wet or dry plaster to the outside of a house by hand or machine. The plaster forms a durable and strong outer shell […]
Read MoreSurfing can be challenging on its own, let alone in the harsh ocean environment. You can catch more waves if you wear the right wetsuit. It will keep you warm and protect you from UV rays, abrasion and other harmful elements. Modern wetsuits are a far cry from the ones that were first introduced in […]
Read More
1. Lightly Sand Walls We recommend that you inspect the condition of your walls before starting your interior painting. There may be rough bumps and ridges on the wall depending on its style, if it has texture underneath the paint or what it’s been through. We recommend using fine-grit paper to sand the wall before painting […]
Read More
GIB board is a lining board with a cardboard surface and a gypsum core for the Gibraltar board. The Gypsum can be with or without additives and is generally extruded between thick sheets of facer and backer paper. GiB board is used mostly in the construction of interior walls as well as ceilings. In case […]
Read More
To achieve a more attractive and durable finish when GIB plasterboard is stopped, it is important to adhere to some basic rules. This guide will explain the four basic laws of GIB fixing & stopping. It will also help you locate a professional GIB installer. Ask questions about their techniques and services before you hire […]
Read More
Seniors want independence as they age. It’s not unusual for seniors to experience challenges such as limited mobility, cognitive decline, or isolation after the death of their partners or friends. While some older adults may not require daily medical attention, they might still need support with daily activities and social interactions. This is where companion […]
Read More
It is important to make a decision about a teacher for your violin. To ensure a good match, parents and students need to evaluate teachers according to a set of criteria. Because everyone learns differently, it is important that the teacher you choose matches the student’s learning style and personality. It is important that the […]
Read More
The kitchen is usually the main room that most homeowners choose to renovate or extend to add personal or material value to a property. The result can be very rewarding, but a kitchen renovation or remodel is not a light undertaking. Aside from considerations of modern decor design, there are a number of legal formalities […]
Read More
Financial advisors can help with every aspect of your financial life, including budgeting and financial planning. Let’s look at the different types of financial advisers and how you can choose the right advisor for your needs. Financial planning advisor can help people manage their money and reach their financial goals. They can provide a wide […]
Read More
The best way to give a new look to your interiors is by plastering them. It can be done by yourself or done with professional help. Expert tips are needed so that you can plaster the wall yourself. In case it is a replacement, you need to first consult an expert in the drywall installation […]
Read More
We agree that painting and designing each room of your house is a bit of a tricky business! But decorating and designing a girl’s room can be a totally maddening affair. The room has to be just as carefree as your girl is and should look charming, cute, sweet, and perfect — and everything that […]
Read More
A hen party is all about making the bride feel special on her single life sendoff. Being a tradition as old as time, it is the responsibility of the bride’s best friend to throw her a pre-wedding extravaganza to celebrate the last days of her single life. While everyone agrees that they are a lot […]
Read More
When it comes to trends, one can never be too sure if all the predicted trends will make it big in the coming year. However, one thing is for sure. And that is the fact that there are always a few trends that will last and stand the test of time. This is for the […]
Read More
Imagine this situation, where you start by planning to go shopping for new furniture. You are confused where to begin, but you know the drill, you should have a good look at all options before finalising. You check out furniture websites online, scour nearby stores, even visit some designer high-end furniture shops, but you don’t […]
Read More
Choosing the perfect chocolate for your Valentine can be a delightful yet daunting task. With a myriad of options available, from rich dark chocolates to creamy milk chocolates and everything in between, it’s essential to consider several factors to ensure you select a treat that will melt not only in their mouth but also in […]
Read More
Chocolate: a word that evokes delight and anticipation in millions around the globe. From decadent truffles to velvety cakes, chocolate holds a cherished place in the world of confectionery. But what exactly gives chocolate its irresistible flavor, its luxurious texture, and its sometimes tricky reputation as an ingredient? As a food scientist, let’s delve into […]
Read More
In the intricate world of cocoa, where chocolate reigns supreme, trends continually emerge, captivating the taste buds of enthusiasts worldwide. As a cocoa expert, I’ve traversed through plantations, delved into the nuances of processing, and savored the final delights. Today, I present three sweet trends that are reshaping the landscape of cocoa consumption. 1. Bean-to-Bar […]
Read More
Depression is a complex mental health condition that affects millions of people worldwide. While numerous treatments exist, there’s a persistent myth that consuming chocolate can alleviate symptoms of depression. This belief stems from anecdotal evidence, media portrayal, and perhaps wishful thinking. However, scientific evidence doesn’t support this notion. In this essay, we’ll explore the relationship […]
Read More
Chocolate has been celebrated for centuries as a delectable indulgence, revered for its rich taste and perceived mood-enhancing properties. Beyond its culinary appeal, recent scientific research has delved into the potential cognitive benefits of consuming chocolate. This investigation has sparked widespread interest and debate regarding the relationship between chocolate consumption and brain function. In this […]
Read More